World Creation
Using Plugins
Guides
Building & Publishing
API Reference
Designs
Views
Babylon Migration
Vatom Spaces are migrating the underlying rendering engine in the application from Three.js to Babylon.js. Whilst Three.js is an excellent rendering engine, Babylon.js provides a better fit for the Vatom Spaces longer term road map.
The change can impact existing spaces built with the current version of the application. Whilst every effort has been made to minimise the impact of the change on existing spaces, some spaces will need updates to create an experience comparable to the existing one.
Transition period
The new version of space will go live soon. In order to minimise the disruption, clients can request to remain on the Three.js version for a period of one month post go live so the required adjustments can be made where needed. It should be noted that there are a number of new features due to be delivered in the new version of the platform. No new features will be added to the version that uses the Three.js rendering engine.
Space elements and functionality that may be impacted
There is difference in the way different rendering engines interpret aspects of 3d models. As a result some functionality of the spaces platform may be impacted and may require changes to the underlying model itself as well as the configuration of certain elements of the space. It is important to note that some spaces may just work with no adjustments needed.
From testing the following identified areas may require attention.
- Visual rendering
- Camera views
- Navigation
- Collision
- Objects
- Plugins
- World
- Performance
Each of these areas are discussed in more detail below.
Visual rendering
It is possible your space may look quite bright/washed out. This is because Three.js uses linear colorspace, instead of sRGB, which is the colorspace that more closely matches the .gltf standard.
Best is to go back into your 3D authoring pipeline and adjust your assets. If they look normal in Blender, for instance, they should now look the same in your space.
Note: Ensure that "sRGB Pipeline" is enabled in the World tab of the Editor in the production version of Spaces. This will attempt to match Babylon's rendering process in Three.js, giving you better compatibility and less of an impact once the switch is made.
Camera views
Make sure the camera angle/position you have previously set on entry is still working as intended.
Navigation
Make sure moving (with mouse, trackpad, WASD and arrow keys), jumping, double-click works as before.
Objects
Some pics may appear darker or not renderd properly. A quick fix is to open the Advanced Editor by right-clicking the object. Then click the Render tab and make sure Material Type is set to Basic.
Plugins
The default plugins should work normally as before. Just a note for Places, the landing position may have shifted a bit. If this is the case then you just need to update the coordinates.
World
Few settings may need a bit of tunings in Editor > World
| Category | Items |
|---|---|
| Entry | The view entry may need some adjustments, especially Orientation, Tilt and Zoom distance. |
| Render Distance | Depending on the size of the Skybox, the Render Distance may need to be tweaked a bit. |
| Effects | If the space looks too bright, ticking Enable Tone Mapping makes the space look a bit softer. |
Performance
We have done our bits to get the best optimization but it is advised you check your FPS for your specific spaces.
If you think you do not get what is expected, it may worth to review your assets and re-optimize it in your 3D authoring tool. Key values are draw calls, triangles and meshes.
Fixing Collision
If you are experiencing strange behaviours in your scene where the avatar is falling through the floor or is able to pass through surfaces that have the collide attribute enabled, then the issue is very likely inverted normals or negative scaling in your mesh. Here is how to quickly fix these issues and have a more robust mesh for your scene.
This guide requires Blender. It is a free and small download that works on both windows and Mac machines.
Download the appropriate version, install it and then proceed to step 1.
Step 1 - Opening your model in Blender
The first thing we need to do is apply any scaling in the mesh/scene to get our scaling values back to 1.
- Open Blender
- Start a new project
- Delete the default cube and camera from the scene (select the object and hit the ‘x’ key and confirm removing from scene)
- Import your GLB into blender. File > import > glTF 2.0
- Once your mesh is in the scene, select everything in the scene (shortcut ‘A’). an outline should appear around all selected objects
- Open the ‘Mesh’ menu > Apply > Scale. This will fix any negative scaling in your scene and set the scaling values back to 1 which is what we want. You won’t notice any visual changes when doing this.

Step 2 - Assessing your normals
The next thing we need to do is assess our face normals for any issues. Normals tell Babylon which direction the faces of your mesh are facing.
This is important when calculations are being done to determine collisions within our spaces.
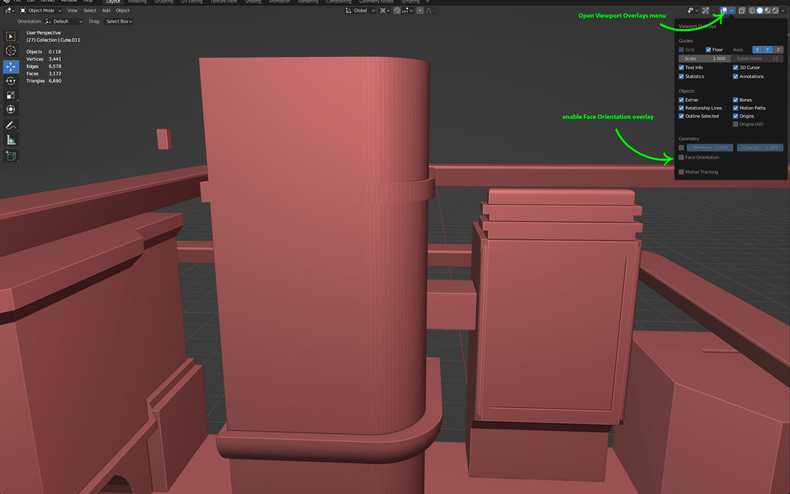
- Open the ‘Viewport Overlays’ menu
- Check the ‘Face Orientation’ overlay option

We can now see our normal/face orientation represented on our models.
Blue is an outside face and red is inside facing. Blue is good and will work well with the collision system in Babylon.
Red will lead to undesirable behaviours. If your model has red normals continue on to the next step.

Step 3 - Fixing Normal Issues
Once we have discovered inverted normals within our mesh/model. We can now rectify them.
- Select the element in your model with the inverted normals, in our example it is the
floor plane. - Change over to
Edit ModeshortcutTAB - Select all red faces. If the offending part of the mesh is separate from the rest of the model, simply press
Ato select all faces. - Open Mesh > Normals > Flip. (you can also choose one of the
Recalculateoptions to get Blender to decide which way the normals “should” be facing.)

If successful you should have an entirely blue scene and/or only red faces inside your meshes where they belong.

Congratulations! You have now fixed the normal issues in you model / scene. Now lets export the fixed mesh for use in spaces.
Step 4 - Exporting to GLB
Finally we need to export your corrected meshes back to the .GLB format used by spaces / babylon.
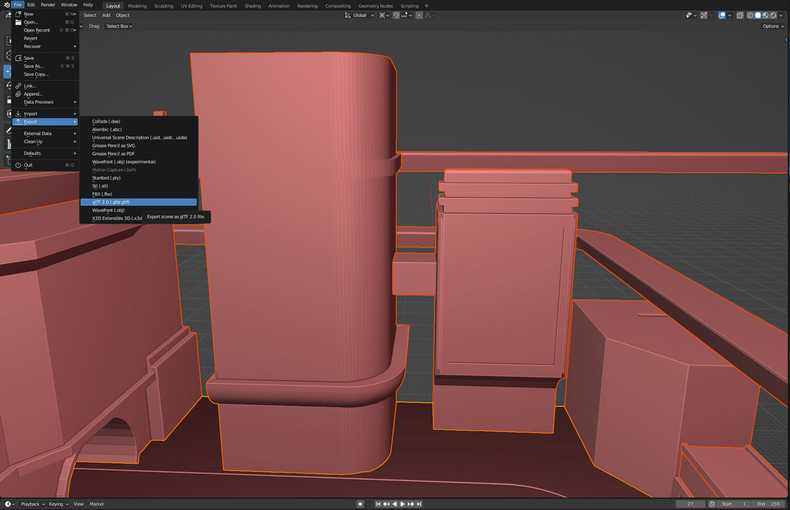
Select File > Export > glTF2.0 (.glb/.gltf)

- Choose the options in the right hand menu that suit your needs
- Give the file the desired name (recommended to name it the same as the starting model for easier loading into spaces)

That’s it! Your model is now ready to be inserted back into spaces and any collision issues should now be fixed.